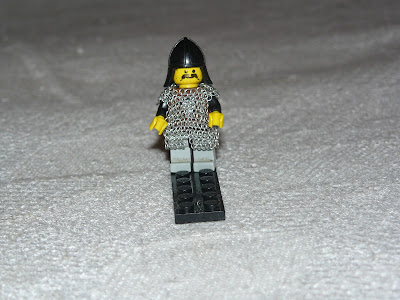
Phew! Its done. I finally sat on my behind and am now done with the lego DIY armour version 3. Gave me a headache but it was worth it.

USED MATERIAL: custom made links - 0.3mm rhodium plated copper wire, winded on 1.2mm dowel.
Since I do believe I've reached the maximum development possible for this project, I made a video tutorial on it. Its not the best, and well my camera isn't the best too, but it will do. Any chainmaille enthusiast will be able to catch up and get on with it in no time. For the rest - hold your horses, this is not for newbies. Do some easier stuff and then try to ruin your eyesight with this.
Here's the front in better detail.
And the back.


Here's the armor removal process. Its like putting on and removing a full sized chainmail hauberk, except the part where you remove the head first. It has to be done very slowly and carefully. A stronger pull and you will open some of the links, and repairs on something THIS small can make you go nuts. (Unless you already are, like me)
 Armour removal process step 2
 And its off.


USED MATERIAL: custom made links - 0.3mm rhodium plated copper wire, winded on 1.2mm dowel.
Since I do believe I've reached the maximum development possible for this project, I made a video tutorial on it. Its not the best, and well my camera isn't the best too, but it will do. Any chainmaille enthusiast will be able to catch up and get on with it in no time. For the rest - hold your horses, this is not for newbies. Do some easier stuff and then try to ruin your eyesight with this.
Here's the front in better detail.

And the back.

Pimp my horse!

Here's the armor removal process. Its like putting on and removing a full sized chainmail hauberk, except the part where you remove the head first. It has to be done very slowly and carefully. A stronger pull and you will open some of the links, and repairs on something THIS small can make you go nuts. (Unless you already are, like me)


Here it is again compared with the lego armour version 1.